
There are many different annotation tools you can use on your Showbie documents. This guide outlines each and how to use them!
✍️ When creating annotations in Showbie, be sure to click Done to save your annotations. Annotations are not saved until Done is selected.
Text Tool
The Text Tool allows for typing text directly on the page in Showbie documents for when longer text is needed. You can customize the color, font size, and alignment of text. The text is editable after it’s been saved and Showbie keeps track of who authored the text and when it was created or last modified.
Using the Text Tool
Open the assignment document to be annotated or edited.
Tap on the Text Tool (T) icon in the toolbar and then tap anywhere on the document to begin typing.
When you are finished adding text, make sure you tap Done to save your work.

Font Options
To access the font options for the text tool, make sure you have selected the text box you’d like to change the font of, and then tap the Text Tool (T) icon again. There you can select rich text options such as font sizing, format and color!
Deleting a Text Box
Web Browser
Right-click on the text box
Click Delete
iPad App
Select the text box
Tap and hold the text box
Tap Delete

Resizing & Moving a Textbox
To resize the text box:
Select it, then drag one of the sizing circles to the desired size. Tap outside the text box when you’re done.
To move the text box:
Select it, then tap and drag the box to its new location. Tap outside the text box when finished.
Pen Tool
Use the Pen Tool to draw or write freehand. After selecting the pen icon, tap it again to open the pen options palette. While the pen tool is selected, use two fingers to zoom and scroll.
When you’re finished, tap Done to save your work.

💡 Tip: You can draw straight lines with the Pen Tool! Just hold a line for a few seconds to straighten it. You can even connect multiple lines to create shapes.
Highlighter Tool
Tapping on the highlighter icon selects it, but tapping a second time will open the color palette. Here you can select other highlighter colors and sizes to use. Highlight all of the important parts of your file and tap on Done to save.

You can also make a straight line with the highlighter tool and straighten it by holding for a few seconds. You can even connect the lines to create shapes!
Annotation Layers
Layers help keep annotations organized. You can use the Layers Tool to show or hide annotations and filter them by Teacher, Student, or Shared Items.
How to use layers:
Open a file that has annotations.
Tap the Layers icon (three stacked squares) in the top-right corner.
Toggle each layer on or off to show or hide annotations.
Note: The option to turn layers on/off will only appear if the appropriate layer has annotations on them. For example, the option to toggle the student layer will only appear if the student has annotated on the file.

Pinned Comments
If there’s not a lot of space in your file but you’d still like to add annotations, the pinned comments feature is a great way to make comments in a much neater way than using the pen tool or text box.
Open the PDF or image you’d like to annotate
Tap on the comment bubble (bubble with 3 lines) in the annotation toolbar at the top
Tap anywhere on the file to add a comment (you can move it around afterwards)
Tap Save when you’re done
You can move the comment around by tapping and holding, then dragging it.
Pinned Comment Options
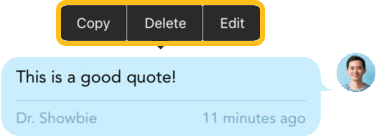
Open the pinned comment by tapping on it
Tap and hold the comment to bring up the Copy, Delete, or Edit options
Voice Notes
Voice notes are a great way to add verbal feedback or instruction to an assignment or document. You can learn all about using voice notes here!

Troubleshooting
Why Can't I Annotate my Document?
Why Can't I Annotate my Document?
Not all file types can be annotated in Showbie. For file types that don't support annotations, in the toolbar at the top (where the annotation tools are usually located) only the file name, grading icon, and the share icon will be available.
My file isn’t a supported type or extension, how can I annotate?
My file isn’t a supported type or extension, how can I annotate?
There are plenty of programs available in the App Store that can convert files to PDF (for example). You can also try taking a screenshot of your work, and then annotating the image on Showbie.
If your file is from another app, make sure you check the export/share settings for your file to see if it can be shared as a PDF or image.